Wellion VivaDiag Rapid SARS-COV-2 AG Antigen swab test Covid-19 from the nasal region (also for children) 1 piece
Produkt již není možné zakoupit. V případě zájmu Vám náš zákaznický servis sdělí informaci o dostupnosti zboží.
Product description Wellion VivaDiag Rapid SARS-COV-2 AG Antigen swab test Covid-19 from the nasal region (also for children) 1 piece
| Manufacturer | MED TRUST Trading Companym.b.h. |
| Packaging | 1 |
SAMPLING AND HANDLING
1. Sampling
- It is important to collect as much secretion as possible from the nasal swab (recommended). Insert a sterile swab into one nostril. The tip of the swab should be inserted up to 2.5 cm (1 inch) from the edge of the nostril. Rotate the swab 5 times along the mucous membrane inside the nostril to ensure that both mucus and cells are collected. Repeat the same procedure for the other nostril to ensure that an adequate sample is collected from both nasal passages (use the same swab).
- Oropharyngeal swab sample (optional) It is important to collect as much secretion as possible. Insert a sterile swab into the throat, where most of the secretion is present in the red area of the pharyngeal wall and maxillary tonsils, to collect a throat swab sample. Gently rub along the tonsils in the throat and pharyngeal wall to collect the sample. Do not touch the tongue when removing the swab.
- Nasopharyngeal swab sample (optional) It is important to collect as much secretion as possible. By visual inspection, insert a sterile swab into the nostril that shows the most secretion. Hold the swab close to the nasal septum and gently press on it towards the back of the nasopharynx. Rotate the swab 5 times and then remove it from the nasopharynx. Nasal swab Nasopharyngeal swab Nasopharyngeal swab Nasopharyngeal swab 2. Sample processing Freshly collected samples should be tested as soon as possible. Proper sampling and preparation procedures are essential.
PROCEDURE FOR PERFORMING RAPID DIAGNOSTIC TESTS
- it is recommended to use disposable gloves when performing a rapid diagnostic test and performing hand hygiene before and after testing with soap and water or hand sanitizer gel.
- Allow the test equipment and reagent solution to reach a temperature of 15-30°C before testing.
- Hold the sealed bag vertically and allow all the extraction solution to flow into the flask. Break off the end of the bag and squeeze the flask to pour all the solution into the extraction tube.
- To remove the sample, see the section Sampling.
- Insert the swab with the sample into the tube filled with reagent solution. Rotate the swab 5 times by pressing the swab head against the bottom and side of the reagent tube. Remove the swab by pressing against the sides of the tube to extract the liquid. Try to get as much liquid out as possible. Dispose of the used swab as biohazardous waste.
- Put the cap on the tube. Connect the cap to the reagent.
- Remove the test device from the sealed foil bag and place it on a clean, flat surface.
- Apply 3 drops (approximately 60 μL) of the collected sample to the sample well. Avoid bubbles during application.
- Read the test result after 15 minutes. Do not read the result after 20 minutes. 15 min Read the test result after 15 minutes, do not evaluate after more than 20 minutes.
NOTE
- Do not confuse or mix the solution with reagents from different batches.
- handle reagent solution with care, avoid contact with eyes or skin. If contact with eyes or skin occurs, wash thoroughly with water.
- Observe local regulations for disposal of used materials.
READING TEST RESULTS
- Positive result: quality control band C and detection band T are displayed.
- Negative result: Only the quality control band C is displayed, while no other bands appear on the detection band.
- Invalid Result: The C control strip does not appear, indicating that the test is invalid, regardless of whether the detection strip is displayed or not. Take a new sample and perform another test with a new device.
Positive: both the detection strip (T) and the quality control strip (C) are reddish-purple in the detection area.
Negative: Only the quality control strip (C) appears in the detection area.
Invalid: No reddish purple quality control strip (C) appears in the detection area, regardless of whether the detection strip (T) is coloured or not.
QUALITY CONTROL
Internal procedural controls are part of the test. The colored bar displayed in the control area (C) represents an internal procedural control. Confirm sufficient sample volume and successful procedure. Control standards are not included in this kit; however, it is recommended that positive and negative controls be performed in accordance with good laboratory practice to confirm the test procedure and verify proper function.
| Manufacturer | MED TRUST Trading Companym.b.h. |
| Packaging | 1 |
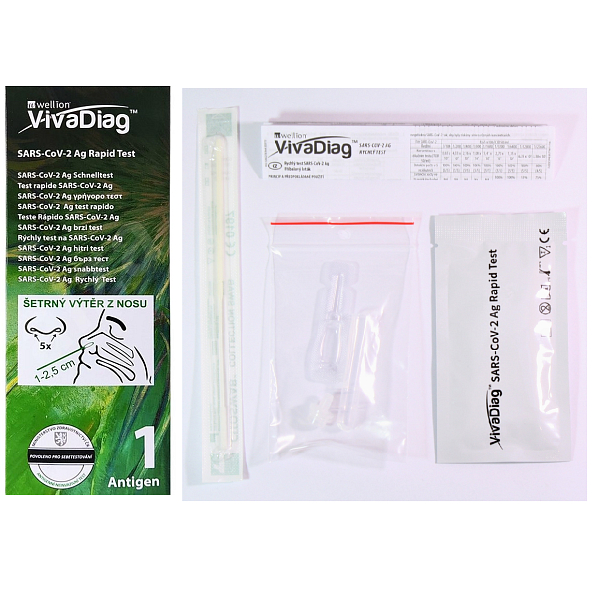
Contents of one pack
- 1× Test Set
- 1× Extraction tube and solution
- 1× Sterile swab
- 1× Tube stand
- 1× Packaging information
| Manufacturer | MED TRUST Trading Companym.b.h. |
| Packaging | 1 |
The test is exclusively for in vitro diagnostics and professional use.
It is intended for clinical laboratories and for use by professional healthcare professionals at the point of care.
- The manufacturer of antigen tests with the exception for self-testing by the Ministry of Health according to §4 paragraph 8 of Government Regulation No.56/2015 Coll.
- The test is approved for contribution of health insurance companies within the framework of employee testing (according to the Ministry of Health of the Czech Republic).
- The product is sold with 0% VAT according to the decision of the MoF, § 260 (3) of the Tax Code.
STORAGE AND HANDLING
- Store the diagnostic test kit in a cool, dry place at a temperature of 2-30 °C. Protect from light. Exposure to temperature and/or humidity outside the specified conditions may cause inaccurate results.
- Do not store in a refrigerator or freezer. Use the test kit at temperatures between 15-30 °C.
- Use the test set with humidity between 10 and 90%.
Products similar to Wellion VivaDiag Rapid SARS-COV-2 AG Antigen swab test Covid-19 from the nasal region (also for children) 1 piece you can also find in the following categories:
Recently visited products

Wellion VivaDiag Rapid SARS-COV-2 AG Antigen swab test Covid-19 from the nasal region (also for children) 1 piece

Maybelline Fit Me! Liquid Foundantion SPF18 Makeup 315 Soft Honey 30 ml

The Doctor Health & Care Keratin + Arginine + Biotin Maximum Energy keratin shampoo for strengthening and shine 355 ml

Catrice Absolute Eye Color Mono Eyeshadow 090 Bring Me Frosted Cake 2g